Restore: the hips program
learning how-to hip hinge and deadlift
Learning how to hip-hinge:
the next step in improving hip stability and strength
As we start to get into the program, it’s going to be tempting to rattle through this “basic” stuff and rush headstrong into “the” primary stability and strength exercises coming up.
My advice?
DON’T. Take baby steps. Each of the elements of this program is here for a reason – progressing to more advanced skills depends upon the learning and mastery of the skills that precede them.
The HIPS are your powerhouse!
The ball and socket joints that are our hips – much like our shoulders – are able to move freely and generate tremendous torque in the process.
All of the muscles that surround those joints – not only produce force and power to drive us forward, they also very importantly help to stabilize our entire pelvic girdle and the spine as well.
The key to making sure it happens as it’s supposed to? There are three, actually.
1. You need to be able to achieve that neutral low-back position and maintain it (a skill that has been hammered home throughout this and in our other programs)…and then…
2. Master the basic abdominal brace and progress it, so that your trunk can be the base of support for the hips. The hips can’t be the center of power they’re designed to be without a stable and strong core to protect the spine, central nervous system, and even our vital organs.
3. Make sure you’ve mastered the two basic hip stability and strength exercises that preceded this section. Yes, there’s a bit of redundancy here – for a reason! We can’t escape the inevitable desire to forge ahead to the “hard” stuff – when in truth, it’s the “basic” stuff that will give us most of the benefits! And set the table for what is to come.
Moving through the hips – not the low-back

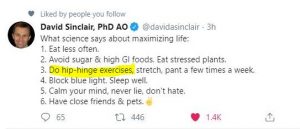
David Sinclair, PhD, is the well-known author of “Lifespan: Why We Age and Why We Don’t Have To.” In this recent tweet, he reinforces the importance of hip-hinging! 🙂
One of the most important elements to building better hip stability and strength is to make sure we are moving THROUGH our hips when we train – not through our low-back.
The first skill we will learn is sometimes referred to as a progressive “waiter’s bow.” I simply like to think of it as a standing hip-hinge progression – one of the simplest tests of both hip-hinging ability and back-side range of motion.
That’s right, in addition to helping you pattern a basic hip-hinge, it will also test your range of motion along the back-side of your body (also known as the “posterior chain”), and will help illuminate any shortness or tightness in the hips/glutes, hamstrings, and low-back.
What is the most important goal of this first exercise and skill?
It is this: To help you LEARN and groove the feeling of moving through your hips, NOT your low-back. That’s it.
Go through the video and then practice the progressive positions, step by step.
Be patient. Move in and out of each progression.
As you progress, your core control and mobility will be challenged. Identify whatever is the area of opportunity and fix it, whatever it may be. Perhaps you’ll need additional mobilization of those tissues along the backside or more work in RESTORE: The Foundation, to achieve better core stability and control.
How To Begin: Basic Hip Hinging
Some important reminders as you practice:
-
Creating a good “static stomp” – screwing your feet into the floor – creates some beneficial torque at the hips and helps connect them to your pelvis and then to your trunk.
-
Think continuously of “lengthening” your spine – you may have the feeling of falling forward and over as you hinge – that’s OK! In fact, it is a good indication you’re keeping your trunk long and hinging correctly.
-
The further forward you hinge – the MORE you’ll need your core to do its job of maintaining a neutral low-back. If you lose the feeling or the position, STOP. Re-set. Then go back to a standing position and try again. Re-focus on that low-abdominal brace.
-
Use a mirror! Use video. Watch yourself. Do you notice where you might be losing the desired position and integration? Stop at that point and work at that range of motion for a while. Do some diagnostics to see where the breakdown may be occurring.
When you feel comfortable with this and like you’ve mastered it, you’re definitely ready to move on to STEP 2, “How To Progress: Hip Hinging and Deadlift,” where we’ll raise our game and take this learning to another level. See you there! Keep it fun!
