Restore: the hips program
assessing and training hip joint stability
Assessing dynamic hip stability
The first thing we looked at in STEP 2: ASSESSING Hip Stability was the End-Range Lift-Off for Hip Extension. As you know now, we looked very specifically at one way in which our HIPS need to be able to function well – without other areas of the body contributing in any way TO that hip extension.
That exercise is about seeing what the hip can do ON IT’S OWN. No compensating….no contributions… from any other body part.
If you found that exercise difficult or even impossible (including having scaled it to make it easier), then that is your first training goal: improve THAT movement with daily practice and focus.
In addition to the End-Range Lift-Off, we also should assess stability while standing – AND moving – on a single leg. These are even more dynamic challenges for the hip.
The single BEST way to accomplish this is to look at stability on a single leg during running – to see what is happening DURING running itself.
(This is the single BEST reason to go through a Virtual Gait Analysis. (VGA))
When you take a detailed look at exactly what is happening when you load a single leg in running, you are able to assess how stable the hip girdle is on a single leg.
Keep reading as I will discuss the run video analysis a bit further down the page. Beforehand, however, let’s discuss other options as well as recommendations to get a good sense of where you are right now.
Keep reading!
If you are curious as to why we are getting so detailed and scaling this assessment back to the bare bones (so to speak), it is because of one thing:
The inherent difficulty of looking exclusively at the hips and how they are FUNCTIONING dynamically, without any other areas of the body kicking in to assist.
We need a CLEAR and concise picture of where we are at NOW, so that we know what our targets are moving forward with our training.
What can you do now, to take action and create a baseline for hip stability on a single leg?
Here are three suggestions:
1. Assess your ability to stand on a single leg and balance WITH YOUR EYES CLOSED. Our target goal time for you is 60-seconds. No cheating or toe-tapping! 🙂
Can you stand on a single leg with your eyes closed for 60-seconds? If so, GREAT! If not, you need some practice.
Check out the instructional video at the bottom of this page – for a bit more information on this (often overlooked but) important skill!
2. Video yourself doing a simple one-leg squat. While this movement obviously isn’t nearly as dynamic as running, it will still give you a basic sense of your stability on a single leg.
To be graded well on this movement, you’ll need to be able to easily maintain alignment as you simultaneously squat down at the hip, knee, and ankle. To learn more, do it more quickly and include an “in-place” squat jump as part of the assessment.
For a review of the Basic 1-Leg Squat, see the instructional video below.
3. Get in touch and go through a Virtual Gait Analysis. Make it easier on yourself and get more information, as this is the easiest and best way to get a complete picture of what’s happening when you are running, inside-out! Follow the link to read more and learn more.
Continue reading to learn MORE about the importance of assessing stability on a single leg during running.
However, beyond that, you have TWO tasks here to get busy with:
1. Single-Leg Balance.
2. Single-Leg Squat.
What do these look like and what do they tell you about where you’re at?
If you would like to PRINT a PDF of all of the written information here, CLICK HERE!
Let’s NOW talk about assessing stability on a single leg DURING running.
Your goal, to truly KNOW where your starting point is when beginning to train hip stability and strength…
…IS TO look at your running form and assess your single-leg stability in the mid-stance phase of the stride.
Once you have your “baseline” (where you are right now), you can go through the progressive STEPS to train in this program, and then re-assess in the future – to see how you’ve improved!
NOT entirely sure what I mean? Keep reading.
Check out this picture below, which is clipped from the video also on the VGA page (that was hyperlinked earlier).
What do you notice when you compare the left and right side images?
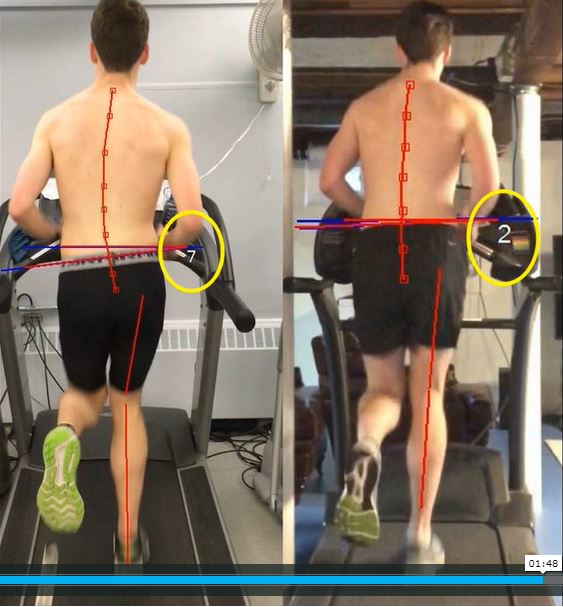
The image on the left:
SEVEN degrees of “lateral pelvic drop,” which is simply a visual demonstration of how UNSTABLE the entire hip girdle and core are. And dis-integrated.
When this was taken, this runner was frustrated with a few different chronic injuries.
The image on the right:
Only TWO degrees of “lateral pelvic drop!” That’s a FIVE DEGREE improvement from the left – that is massive!
When this was taken, this runner was a lot happier, training better, and able to gradually improve fitness.
Why? Because you can’t train and improve when you’re injured!
If you would like to take a “deep dive” into hip stability on a single leg during running and learn the ins and outs of what its all about, CLICK HERE to go to another page on the site that explores “BEFORE” and “AFTER” results from a Virtual Gait Analysis. Don’t miss this opportunity!
 Interested to learn more? Keep reading.
Check out this image to the left.
What does it say to you?
Do you understand what it represents?
What is the story with this image?
How does it relate to running and what is happening on a single leg during mid-stance?
It shows in simple graphic form how the STABILITY we possess at the center of our body, acts in a very important way to affect both our ability to RESIST force (from gravity and ground reaction forces that are acting on our body), as well as our ability to PRODUCE force (via each foot-strike – or if you’re a cyclist, the pedal stroke… or if you’re swimming, the swim stroke).
Our GOAL in training to improve the mobility and stability and strength of our hips (and core!) comes down to improving speed and injury resistance, due in part to this very specific relationship.
The Basic 1-Leg Squat
Barefoot Single Leg Balance
Use all of the information you have learned and also what you have learned about YOURSELF and your skills, and move on to the next phase of training.
If you need to, pause and re-set or review any of the skills that have been covered to this point in time.
Don’t rush the process. Take your time. Learn, practice, grow!